As a Linux/Mac user, I use good old rsync to keep files on all my computers in sync. My wife on the other hand is not CLI-savvy and is a Vista user. How should she keep files backed up and in sync? My answer: Get Dropbox!
When all the tech details are left for the techies, here is what Dropbox does: creates a 'My Dropbox' folder on your computer and keeps its contents backed up on its server. If you chose, you can put Dropbox in another computer and the program will make sure that the contents in the Dropbox folders of your computers and the web server are always in sync. The beauty of the system is that all of this is done automatically without any user input.
If you want to get going, here is what you do. First, get dropbox. Download the program and install it. During installation, it will ask you if you are a new user or if you already have an account with them. If you are new, create an account with Dropbox - it uses your email address as UserID. When the program is installed, it puts a 'My Dropbox' folder in the 'Documents' folder of the user (this is the case in Vista. I am assuming it does something similar in Mac and Linux too). Whatever you want to backup, just drag those files into the 'My Dropbox' folder and you are all set! There is a small Dropbox icon put in your taskbar next to the clock. If you right-click on it, it will show you a status of the synchronization process (Backing up for the first time can take a little while depending on the amount of stuff and your internet connection. Subsequent synchronization processes are very fast). Whenever, the files in 'My Dropbox' folder are changed or moved or deleted, those changes are synchronized with the web server automatically. The program detects if you have internet connection and if you do, it will automatically keep the files in sync. When you do not have access to the internet, the program will wait until you get access and then resume the synchronization process.
The program has a nice and simple web interface too. This lets you access all those files you backed up from any web browser. Also, you can use this program to share files with friends and family. Put all the files you want to share in 'Public' folder and send the unique link to the recipient. File sharing made simple!
What's the catch? 2GB is all you get. So, this is not the kind of program you want to use to backup all your music and photo collections. But, it is a pretty neat program to keep your important documents and files backed up.
Read more!
Showing posts with label Computers. Show all posts
Showing posts with label Computers. Show all posts
Tuesday, September 16, 2008
Saturday, July 12, 2008
EnzymeX - A plasmid editor for the mackind
While ApE is for the masses, EnzymeX is for classy Mac users. Read on for more...
4Peaks is a pretty well-known piece of program used for work with DNA sequencing trace files. EnzymeX is made by the same guys. Their website has a few other interesting programs for Mac users that are worth trying. EnzymeX is a feature-rich plasmid construct designer and editor. You can download EnzymeX from their website for free. Installation, as with most other Mac softwares, is a simple drag-and-drop of the app into 'Applications' folder.
When opened, the program comes up with three choices: creating a new construct, opening an existing construct, or looking up enzyme information. Using this program, you can design your plasmid construct in silico. If you are designing a protein expression construct, you can translate the insert to make sure the gene insert is in-frame and/or protein sequence is correct.
Going into the details of the program with a full feature list is beyond the scope of this entry. I will however highlight a few things I liked.
Read more!
4Peaks is a pretty well-known piece of program used for work with DNA sequencing trace files. EnzymeX is made by the same guys. Their website has a few other interesting programs for Mac users that are worth trying. EnzymeX is a feature-rich plasmid construct designer and editor. You can download EnzymeX from their website for free. Installation, as with most other Mac softwares, is a simple drag-and-drop of the app into 'Applications' folder.
When opened, the program comes up with three choices: creating a new construct, opening an existing construct, or looking up enzyme information. Using this program, you can design your plasmid construct in silico. If you are designing a protein expression construct, you can translate the insert to make sure the gene insert is in-frame and/or protein sequence is correct.
Going into the details of the program with a full feature list is beyond the scope of this entry. I will however highlight a few things I liked.
- The search box on the top right corner of the main window is fantastic. You can not only search for restriction enzyme sites, but also sequence and sequence motifs (DNA and protein).
- 'References' is a nice feature. It has a list of commonly used abbreviations, amino acid structures, codon tables of different organisms, and kozak sequences. In addition, there is a 'buffer composition' table that lists the composition of restriction enzyme buffers bundled with enzymes by different suppliers. If you end up with a sticky end DNA molecule and would like to modify it, 'References' can help you. Just tell the program what you want to do and it will tell you what to do - neat! Finally, the program also lets you visit the ReBase info webpage of any selected restriction enzyme.
- 'Calculator' tool is very handy when you have to quickly find out the concentration of particular sample, or convert between micrograms and picomoles, micromolar to picomoles, picomols to ends, etc. Calculator tool also tells you the molecular weight (in kDa) of a particular nucleic acid fragment based on the number of nucletoides; length, molecular weight and estimated Tm of a given oligonucleotide sequence; and given the insert and vector size and concentrations it will even help you set up a ligation reaction!
- With EnzymeX, setting up those double digests is very easy. Choose the enzymes and the supplier, this program will tell you which buffers to use. Reaction Mixer will even help you set up the restriction enzyme digestion and lets you print the set up - now that's convenient!
- EnzymeX's features are further enhanced by Plugins. I only have a few plugins. One of them allows me to instantly view the hydrophobicity of a translated region of the construct.
Read more!
Wednesday, June 18, 2008
PDFs, Firefox and Mac
If you use Firefox as the primary web browser on your Mac, then you must have noticed that it is a pain to work with a bunch of PDF files. Luckily, now there is a solution.
As a part of my work, I need to open and work with a lot of pdf files. Often, these are research papers published in scientific journals. When I click on a link to open a pdf file, Firefox-Mac (unlike Safari) cannot open that pdf file in the browser window. It will download a copy of that file to the disk and then (if you have set the preferences that way), Preview.app will open it. It is really annoying because then I have to switch windows (Firefox to Preview) in order to work with a webpage and a pdf file simultaneously.
A good friend sent me a link to this post on Ars Technica that talks about a Firefox PDF Plugin for Mac. You can download that plug-in directly from this website. All you have to do is to click on 'Install Now' link to download and install this nifty plug-in (This plugin requires that you use Firefox 3. If you haven't done it already, you should download and install Firefox 3. You have to restart firefox after installation).
As good as this plugin is, it has a few important issues that need to be worked out. These are a few things I noticed:
Read more!
As a part of my work, I need to open and work with a lot of pdf files. Often, these are research papers published in scientific journals. When I click on a link to open a pdf file, Firefox-Mac (unlike Safari) cannot open that pdf file in the browser window. It will download a copy of that file to the disk and then (if you have set the preferences that way), Preview.app will open it. It is really annoying because then I have to switch windows (Firefox to Preview) in order to work with a webpage and a pdf file simultaneously.
A good friend sent me a link to this post on Ars Technica that talks about a Firefox PDF Plugin for Mac. You can download that plug-in directly from this website. All you have to do is to click on 'Install Now' link to download and install this nifty plug-in (This plugin requires that you use Firefox 3. If you haven't done it already, you should download and install Firefox 3. You have to restart firefox after installation).
As good as this plugin is, it has a few important issues that need to be worked out. These are a few things I noticed:
- Go to this link to open a map of Smoky Mountain National Park from the website of NPS. First thing I noticed, the cursor is in 'text selection' mode. On a map like this, I would like to click-and-move around the map area which is not possible. Only way to move around the map is to use scrollbars.
- With no toolbars, it is difficult for users to know how to Zoom-in/Zoom-out. Cmd+ or Cmd- keystrokes do that job.
- To 'Save' this PDF file to disk, you need to go to the 'File' menu, Click on 'Save Page As...' and save it as a PDF to disk. Similarly, in order to print, you need to go to the 'File' menu and click 'Print'.
- Go to this link to open a scientific paper from the Journal of Biological Chemistry. This pdf file is now part of a frame in the current window. Saving this pdf file to disk following the method mentioned above does not work. Nor does the trick to print.
[Update: You can still save the pdf from 'File' menu. Click somewhere in the pdf to activate the frame. Then uust choose 'Save Frame as...' instead of 'Save Page as...']
Read more!
Thursday, June 12, 2008
Gnome-Do on Kubuntu
After using Quicksilver on Mac, I always wanted a similar program for linux too. I used Katapult for a while. Katapult is okay; but it has a few shortcomings.
Recently, I came across Gnome-Do.
"Inspired by Quicksilver and GNOME Launch Box", gnome-do in its most basic form lets you launch programs and files from your computer.
Installation was very easy. Just go to Adept Manager and search for gnome-do and install it. However, that was not the latest version of the program. So, I followed the directions found here to add a repository and install the latest version.
Once installed,run the program from 'Run Command...' entry in the K-Menu. Type 'gnome-do' and hit enter. I just noticed that there is an entry in K-Menu > 'Utilites' for Gnome-do. Gnome-do interface box appears on the screen. Start typing for the program you want to start and you will see the results appear in real time. Use up and down arrow keys to go through other choices. Click on the small triangle present at the top right corner to go to 'Preferences'. In the preferences pane, you can add a host of plugins that enhance the use of this little program.
All this is great, but there is at least one bug that makes this program almost unusable. When gnome-do is summoned by Super+Space keys the interface screen ends up behind the active window. If the active window is large, you cannot even see gnome-do interface screen. This bug has been reported and hopefully it will be fixed soon.
Until then, I am back to Katapult.
Read more!
Recently, I came across Gnome-Do.
"Inspired by Quicksilver and GNOME Launch Box", gnome-do in its most basic form lets you launch programs and files from your computer.
Installation was very easy. Just go to Adept Manager and search for gnome-do and install it. However, that was not the latest version of the program. So, I followed the directions found here to add a repository and install the latest version.
Once installed,
All this is great, but there is at least one bug that makes this program almost unusable. When gnome-do is summoned by Super+Space keys the interface screen ends up behind the active window. If the active window is large, you cannot even see gnome-do interface screen. This bug has been reported and hopefully it will be fixed soon.
Until then, I am back to Katapult.
Read more!
Friday, May 09, 2008
VirtualBox - New and Improved!
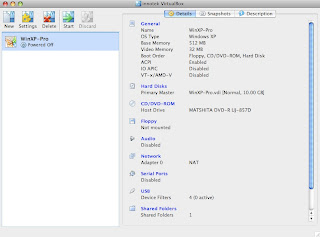
Today, I grabbed a copy of the updated version of VirtualBox. Among other few improvements, VirtualBox for Macs now includes support for Shared Folders.
VirtualBox 1.6 comes with several updated features. You can find out about them here. Of interest to Mac OS X are:
Support for Shared folders is something that I missed in the earlier version. With some help from a friend who understands computers better than I could ever do, I got the shared folders feature working in the previous version too. Having that feature work out-of-box is better.
First, you need to download the latest version (1.6) from this website. Installing it is straightforward. Once, installed, it will upgrade your earlier version to the latest one (the icon for newer version changed).
When I opened the new version for the first time, it popped up a message something about my settings from the previous version. I chose to Backup those files and proceeded.
In order to get the Shared Folders feature working, follow these steps:
That's it! You now have access to all your Mac files. Just go to 'My Network Places' to see your shared folder.
Read more!
VirtualBox 1.6 comes with several updated features. You can find out about them here. Of interest to Mac OS X are:
- MacOS X: fixed seamless mode
- MacOS X: better desktop integration, several look’n’feel fixes
- MacOS X: switched to Quartz2D framebuffer
- MacOS X: added support for shared folders
- MacOS X: added support for clipboard integration
Support for Shared folders is something that I missed in the earlier version. With some help from a friend who understands computers better than I could ever do, I got the shared folders feature working in the previous version too. Having that feature work out-of-box is better.
First, you need to download the latest version (1.6) from this website. Installing it is straightforward. Once, installed, it will upgrade your earlier version to the latest one (the icon for newer version changed).
When I opened the new version for the first time, it popped up a message something about my settings from the previous version. I chose to Backup those files and proceeded.
In order to get the Shared Folders feature working, follow these steps:
- Click on 'Devices' menu of the virtual machine window. Among the list of choices, choose 'Shared Folders'. A 'Shared Folders' window appears.
- Click on the small folder icon with a plus sign on the top right corner to add a new folder that you want to share between Mac and Windows. Another windows pops up.
- Browse to the folder that you would like to share by clicking the 'Browse' button (little folder icon in the top right corner). It is a good idea to choose your Mac {username} folder. Give a name to that share. Check 'Make Permanent' and then click 'OK'. You will return to the 'Shared Folders' window. You can see your shared folder appear below 'Machine Folders' list. Click 'OK' to exit.
- Now, go to 'My Computer' in WinXP and click on 'My Network Places'
- Click 'Add a Network Place' on the left hand panel. 'Add Network Place Wizard' opens. Click 'Next'
- Among the choices for 'Service Providers', select 'Choose another network location' and click 'Next'. A folder selection box appears
- Browse to 'My Network Places' >> 'Entire Network' >> 'VirtualBox Shared Folders'. Here you will find the folder that you shared earlier using 'Devices' menu in VirtualBox VM as '\\VBOXSVR\...' Choose that folder and then click 'OK' to exit. And 'Next' to continue
- Give a name to that network place. Click 'Next' to continue and then 'Finish' to end the wizard
That's it! You now have access to all your Mac files. Just go to 'My Network Places' to see your shared folder.
Read more!
Sunday, March 16, 2008
VirtualBox - Windows on Mac for free!
Virtualbox, is a virtualization software. It can be used to run Windows on Mac OS X. In that respect, it is very much like VMWare Fusion and/or Parallels. However, Fusion and Parallels are commercial software programs - you need to buy a license. Virtualbox, on the other hand, is available free of cost for download under GNU General Public License.
I came across Virtualbox a little while ago while futzing around in the internet tubes. However, at that time the virtualbox for OS X hosts was still beta2. With no real necessity for me to run Windows on Mac at that time, I decided to wait for the final version. As a part of my research, I now need to use a particular Windows program. So, before I shell out $$ for a copy of Fusion or Parallels, I decided to check up on Virtualbox.
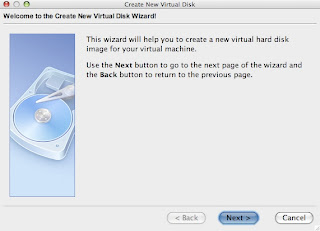
Virtualbox for Mac OS X hosts (beta4) is now available for download here (~21MB disk image file). Once downloaded, in order to install, double click on the file to mount the image and simply drag the Vitrualbox app into the Applications folder. In order to run Windows on Mac, fire up the app and click on the 'New' button on the top left corner to create a new virtual machine. A wizard will guide you through the installation process.
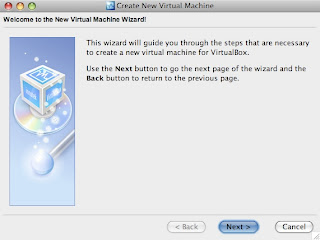
Click 'Next'.
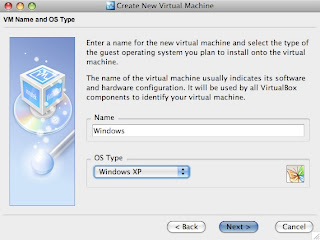
Give a name to your virtual machine. Since, I was going to install Windows, I named it so. Then, pick the 'OS Type' from the list and click 'Next' to continue.
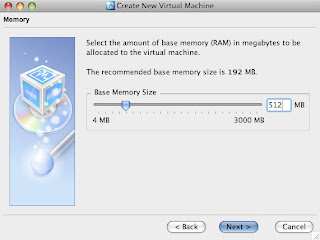
You need to choose how much memory you would like to allocate for Windows. Whatever amount you choose here, that much amount of memory would be unavailable for other OS X apps when the virtual machine is running. If your computer is low on memory to start with, you should not allocate a lot of it to the virtual machine here. 192MB for Windows is a good bet; but I chose 512 in this particular case.
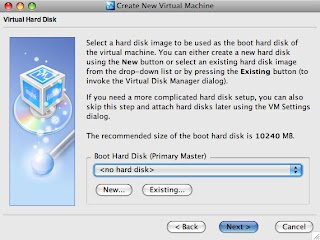
You now have to allocate hard drive space for Windows. If this is the first time you are using Virtual Box, it is very likely that you do not have a hard disk image already. So, you have to click on the 'New' button to create a new one.
A new window appears that will guide you through the steps to create a new hard drive image. Click 'Next' on the new window to continue.
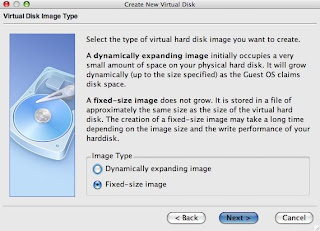
There are two types of virtual disk images: one that dynamically expands and one that is of fixed size. You can pick any kind; in this case I picked one of fixed size.

A filename for your virtual disk image is automatically entered - it is same as the name of your virtual machine. For size, I allocated 10GB for Windows. If you think that you would need more space for files in your Windows partition, you should increase the size here. However, you should keep in mind that the hard drive space you allocate here would be immediately deducted from your total hard drive space on the Mac. So, if you are running short on your Mac hard drive space, you should stick to the minimum. Also, if you are not sure how much hard drive space you want to allocate for windows, go back and pick the dynamic kind of disk image. Once you are done, click 'Next' to continue.
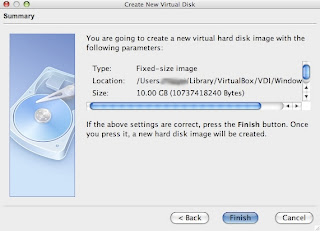
Click 'Finish'. The setup will now start creating a virtual disk image. A little window with a progress bar will appear. It takes a few minutes to create the disk image. So, be patient.

Once the disk image is made, you would go back to the previous window - now with the boot hard drive selected.
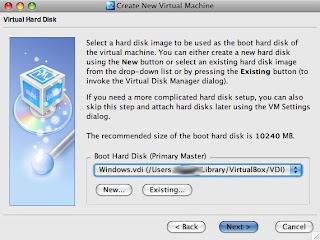
Click 'Next' to continue and then 'Finish' to finish creating a virtual machine.

Once the virtual machine is created, you should see it in the main Virtualbox app window like this:
The default settings for a virtual machine should be okay. However, if you are a little adventurous and would like to tweak the settings of your virtual machine, you can do so by clicking the 'Settings' button.
Now, insert a Windows installation disc, select your virtual machine and hit 'Start'. You would see a new window of virtual machine and it boots from the Windows installation disc. Follow on screen directions to install Windows. Once, you are finished with installing Windows, you need to install 'Virtualbox Guest Additions'. In order to do so, Device > Install Guest Additions. Follow on screen directions to install Virtualbox guest additions. You would have to restart the virtual machine after installation.
That's it! Enjoy(?) Windows on your Mac.
Read more!
I came across Virtualbox a little while ago while futzing around in the internet tubes. However, at that time the virtualbox for OS X hosts was still beta2. With no real necessity for me to run Windows on Mac at that time, I decided to wait for the final version. As a part of my research, I now need to use a particular Windows program. So, before I shell out $$ for a copy of Fusion or Parallels, I decided to check up on Virtualbox.
Virtualbox for Mac OS X hosts (beta4) is now available for download here (~21MB disk image file). Once downloaded, in order to install, double click on the file to mount the image and simply drag the Vitrualbox app into the Applications folder. In order to run Windows on Mac, fire up the app and click on the 'New' button on the top left corner to create a new virtual machine. A wizard will guide you through the installation process.

Click 'Next'.

Give a name to your virtual machine. Since, I was going to install Windows, I named it so. Then, pick the 'OS Type' from the list and click 'Next' to continue.

You need to choose how much memory you would like to allocate for Windows. Whatever amount you choose here, that much amount of memory would be unavailable for other OS X apps when the virtual machine is running. If your computer is low on memory to start with, you should not allocate a lot of it to the virtual machine here. 192MB for Windows is a good bet; but I chose 512 in this particular case.

You now have to allocate hard drive space for Windows. If this is the first time you are using Virtual Box, it is very likely that you do not have a hard disk image already. So, you have to click on the 'New' button to create a new one.

A new window appears that will guide you through the steps to create a new hard drive image. Click 'Next' on the new window to continue.

There are two types of virtual disk images: one that dynamically expands and one that is of fixed size. You can pick any kind; in this case I picked one of fixed size.

A filename for your virtual disk image is automatically entered - it is same as the name of your virtual machine. For size, I allocated 10GB for Windows. If you think that you would need more space for files in your Windows partition, you should increase the size here. However, you should keep in mind that the hard drive space you allocate here would be immediately deducted from your total hard drive space on the Mac. So, if you are running short on your Mac hard drive space, you should stick to the minimum. Also, if you are not sure how much hard drive space you want to allocate for windows, go back and pick the dynamic kind of disk image. Once you are done, click 'Next' to continue.

Click 'Finish'. The setup will now start creating a virtual disk image. A little window with a progress bar will appear. It takes a few minutes to create the disk image. So, be patient.

Once the disk image is made, you would go back to the previous window - now with the boot hard drive selected.

Click 'Next' to continue and then 'Finish' to finish creating a virtual machine.

Once the virtual machine is created, you should see it in the main Virtualbox app window like this:

The default settings for a virtual machine should be okay. However, if you are a little adventurous and would like to tweak the settings of your virtual machine, you can do so by clicking the 'Settings' button.
Now, insert a Windows installation disc, select your virtual machine and hit 'Start'. You would see a new window of virtual machine and it boots from the Windows installation disc. Follow on screen directions to install Windows. Once, you are finished with installing Windows, you need to install 'Virtualbox Guest Additions'. In order to do so, Device > Install Guest Additions. Follow on screen directions to install Virtualbox guest additions. You would have to restart the virtual machine after installation.
That's it! Enjoy(?) Windows on your Mac.
Read more!
Tuesday, December 25, 2007
Annoying Spaces
One of the features I eagerly looked forward to in Leopard was Spaces. After using multiple desktops (also known as Workspaces) in Linux, I always missed that feature in OS X and Windows. When it was announced, I assumed that Spaces in OS X would be exactly identical to multiple desktops in Linux. That, I realize now, was a wrong assumption.
As much as I like Spaces, I feel that it is half baked and nowhere as powerful and/or useful as the multiple desktops in Linux. Here are a few annoying things I noticed:
Read more!
As much as I like Spaces, I feel that it is half baked and nowhere as powerful and/or useful as the multiple desktops in Linux. Here are a few annoying things I noticed:
- I use two spaces most of the time; one for work-related windows and the other for e-mail, IM, web browsing and other stuff. However, there is an overlap in the apps I use for work and personal stuff. For example, I use several web-based applications as a part of my research work and so, I use firefox for both work and personal stuff. Now, say, I open up firefox window in my 'Work' space and start doing something. After a little while when I feel like checking my e-mail and go to 'Personal' space and click on the firefox icon in the dock, I expect to see a new firefox window open up in 'Personal' space. However, that does not happen. A click on the firefox icon in the dock, whichever space I am in, will take me to 'Work' space where a firefox window is already open. Thus, I am forced to use different browsers for Work and Personal uses. This happens with each and every program (for example, Adobe Acrobat and Preview). One might say, I can open a new firefox window and use it in a different Space. Unlike with Safari, right click (or Ctrl+Click) on the Firefox icon in the dock does not give you a choice to open a new window. So, I have to open a new window of Firefox by going to the 'File' menu (or by Cmd+N) and drag it into a different space.
- Cmd+Tab cycles through all the 'Applications' (as opposed to 'Windows' in Linux or Windows). That is not a big issue when one has only one Space. However, when I have multiple windows of an application are open in different Spaces, it becomes an annoyance. Let me explain in a scenario: open Firefox window in Space 1 - call it Firefox window #1. Then open another Firefox window in Space 1 and drag it into Space 2 - call it Firefox Window #2 (you cannot open another Firefox window in Space 2 directly, remember?). If you use Cmd+Tab to go back to Firefox from any other program open in any Space it will by default take you to Firefox Window #1 in Space 1. In order to get back to Firefox Window #2, one has to use Cmd+~. Now, close Firefox Window #1 in Space 1. If you use Cmd+Tab to get back to Firefox from any other program, you expect to get to Firefox Window #2 in Space 2 because it is the only Firefox Window now open - right? But it does not happen. It will take you to Firefox (in Space 1) but because it cannot find Firefox Window #1 there it will just activate the Firefox application - you can see it in the menu bar and that is all. If you want to go to Firefox Window #2 you should click on 'Window' and select the Firefox Window #2 (whatever it's name is). What a pain!
- When working with, say, Firefox in Space #1 where a Finder window is also open and go to Space #2 to check something in another Finder window in Space #2; Finder window in Space #1 is activated when I get back (I expect Firefox to be active - as I left before I switched to Space #2). Exact same behavior with Safari windows too.
- [Added 12/29/07] Just noticed this; I had a few apps running in Space #1 (Finder, NeoOffice, a window of Firefox, Thunderbird and Adium to be specific) and was browsing internet (so the Firefox window was the one on top). I decided to check what is open in other Spaces. So, I started going to other Spaces using the Ctrl+arrow keys. Nothing was open in other Spaces. By the time I came back to the first Space, instead of Firefox window (which was on the top of all other windows when I left Space #1) Finder window appeared on the top! This happens even when I try it the Ctrl+[number] way. This does not happen when there are no Finder windows open in Space #1 (I return to active Firefox window only).
Read more!
Tuesday, December 18, 2007
Safari and Automatic Session Save
This morning I was working on some stuff in Safari with about a dozen tabs open and a popup appeared asking me if I am interested in updating Leopard. I said yes; but it popped up another message asking if I am willing to restart the computer in order to install the updates. None of the tabs open in Safari were very important; I could get back to them very quickly later. So, I decided to close all of them and let the computer install the updates (and give me a short break from work).
After restart, I fired up Safari to get back to my work. I went to 'History' to see if I can get back to where I was quickly. I discovered that Safari 3.0 automatically saves the session before quitting. Just a click on 'Reopen All Windows From Last Session' got me back to where I was! Nice.

Read more!
Subscribe to:
Posts (Atom)

