Hold Shift when invoking the Expose in Mac OS X 10.6, everything is in slow motion! Hold Ctrl when invoking Expose, only the windows belonging to the application in use are displayed.
Read more!
Showing posts with label OS X. Show all posts
Showing posts with label OS X. Show all posts
Monday, February 01, 2010


Friday, May 09, 2008
VirtualBox - New and Improved!
Today, I grabbed a copy of the updated version of VirtualBox. Among other few improvements, VirtualBox for Macs now includes support for Shared Folders.
VirtualBox 1.6 comes with several updated features. You can find out about them here. Of interest to Mac OS X are:
Support for Shared folders is something that I missed in the earlier version. With some help from a friend who understands computers better than I could ever do, I got the shared folders feature working in the previous version too. Having that feature work out-of-box is better.
First, you need to download the latest version (1.6) from this website. Installing it is straightforward. Once, installed, it will upgrade your earlier version to the latest one (the icon for newer version changed).
When I opened the new version for the first time, it popped up a message something about my settings from the previous version. I chose to Backup those files and proceeded.
In order to get the Shared Folders feature working, follow these steps:
That's it! You now have access to all your Mac files. Just go to 'My Network Places' to see your shared folder.
Read more!
VirtualBox 1.6 comes with several updated features. You can find out about them here. Of interest to Mac OS X are:
- MacOS X: fixed seamless mode
- MacOS X: better desktop integration, several look’n’feel fixes
- MacOS X: switched to Quartz2D framebuffer
- MacOS X: added support for shared folders
- MacOS X: added support for clipboard integration
Support for Shared folders is something that I missed in the earlier version. With some help from a friend who understands computers better than I could ever do, I got the shared folders feature working in the previous version too. Having that feature work out-of-box is better.
First, you need to download the latest version (1.6) from this website. Installing it is straightforward. Once, installed, it will upgrade your earlier version to the latest one (the icon for newer version changed).
When I opened the new version for the first time, it popped up a message something about my settings from the previous version. I chose to Backup those files and proceeded.
In order to get the Shared Folders feature working, follow these steps:
- Click on 'Devices' menu of the virtual machine window. Among the list of choices, choose 'Shared Folders'. A 'Shared Folders' window appears.
- Click on the small folder icon with a plus sign on the top right corner to add a new folder that you want to share between Mac and Windows. Another windows pops up.
- Browse to the folder that you would like to share by clicking the 'Browse' button (little folder icon in the top right corner). It is a good idea to choose your Mac {username} folder. Give a name to that share. Check 'Make Permanent' and then click 'OK'. You will return to the 'Shared Folders' window. You can see your shared folder appear below 'Machine Folders' list. Click 'OK' to exit.
- Now, go to 'My Computer' in WinXP and click on 'My Network Places'
- Click 'Add a Network Place' on the left hand panel. 'Add Network Place Wizard' opens. Click 'Next'
- Among the choices for 'Service Providers', select 'Choose another network location' and click 'Next'. A folder selection box appears
- Browse to 'My Network Places' >> 'Entire Network' >> 'VirtualBox Shared Folders'. Here you will find the folder that you shared earlier using 'Devices' menu in VirtualBox VM as '\\VBOXSVR\...' Choose that folder and then click 'OK' to exit. And 'Next' to continue
- Give a name to that network place. Click 'Next' to continue and then 'Finish' to end the wizard
That's it! You now have access to all your Mac files. Just go to 'My Network Places' to see your shared folder.
Read more!
Sunday, March 16, 2008
VirtualBox - Windows on Mac for free!
Virtualbox, is a virtualization software. It can be used to run Windows on Mac OS X. In that respect, it is very much like VMWare Fusion and/or Parallels. However, Fusion and Parallels are commercial software programs - you need to buy a license. Virtualbox, on the other hand, is available free of cost for download under GNU General Public License.
I came across Virtualbox a little while ago while futzing around in the internet tubes. However, at that time the virtualbox for OS X hosts was still beta2. With no real necessity for me to run Windows on Mac at that time, I decided to wait for the final version. As a part of my research, I now need to use a particular Windows program. So, before I shell out $$ for a copy of Fusion or Parallels, I decided to check up on Virtualbox.
Virtualbox for Mac OS X hosts (beta4) is now available for download here (~21MB disk image file). Once downloaded, in order to install, double click on the file to mount the image and simply drag the Vitrualbox app into the Applications folder. In order to run Windows on Mac, fire up the app and click on the 'New' button on the top left corner to create a new virtual machine. A wizard will guide you through the installation process.
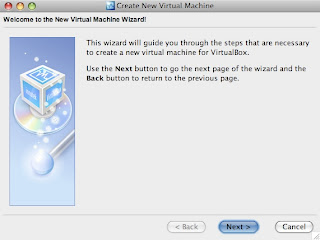
Click 'Next'.
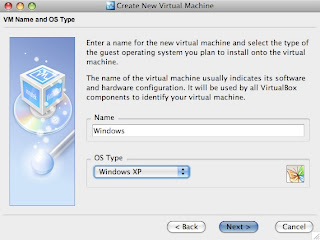
Give a name to your virtual machine. Since, I was going to install Windows, I named it so. Then, pick the 'OS Type' from the list and click 'Next' to continue.
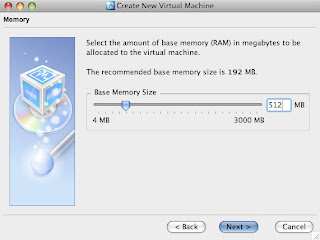
You need to choose how much memory you would like to allocate for Windows. Whatever amount you choose here, that much amount of memory would be unavailable for other OS X apps when the virtual machine is running. If your computer is low on memory to start with, you should not allocate a lot of it to the virtual machine here. 192MB for Windows is a good bet; but I chose 512 in this particular case.
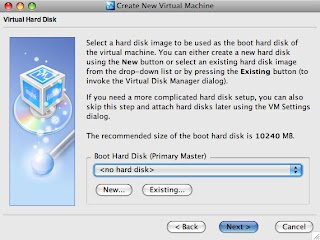
You now have to allocate hard drive space for Windows. If this is the first time you are using Virtual Box, it is very likely that you do not have a hard disk image already. So, you have to click on the 'New' button to create a new one.
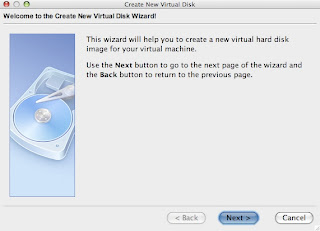
A new window appears that will guide you through the steps to create a new hard drive image. Click 'Next' on the new window to continue.
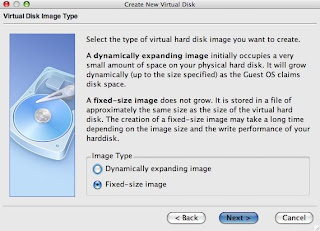
There are two types of virtual disk images: one that dynamically expands and one that is of fixed size. You can pick any kind; in this case I picked one of fixed size.
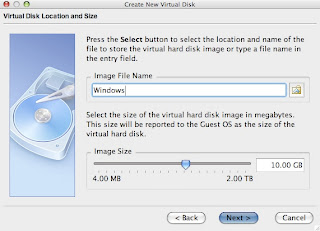
A filename for your virtual disk image is automatically entered - it is same as the name of your virtual machine. For size, I allocated 10GB for Windows. If you think that you would need more space for files in your Windows partition, you should increase the size here. However, you should keep in mind that the hard drive space you allocate here would be immediately deducted from your total hard drive space on the Mac. So, if you are running short on your Mac hard drive space, you should stick to the minimum. Also, if you are not sure how much hard drive space you want to allocate for windows, go back and pick the dynamic kind of disk image. Once you are done, click 'Next' to continue.
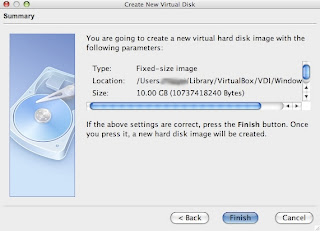
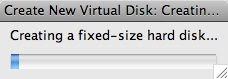
Click 'Finish'. The setup will now start creating a virtual disk image. A little window with a progress bar will appear. It takes a few minutes to create the disk image. So, be patient.
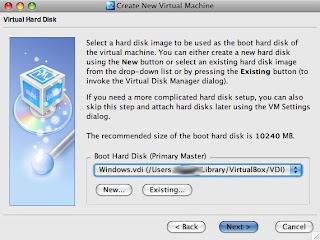
Once the disk image is made, you would go back to the previous window - now with the boot hard drive selected.
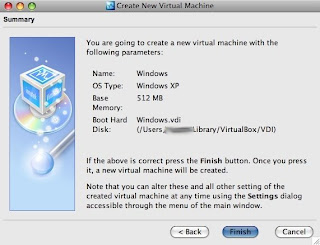
Click 'Next' to continue and then 'Finish' to finish creating a virtual machine.
Once the virtual machine is created, you should see it in the main Virtualbox app window like this:
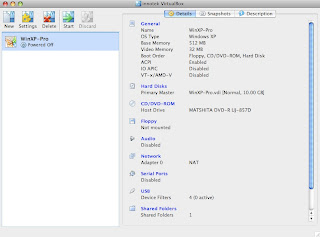
The default settings for a virtual machine should be okay. However, if you are a little adventurous and would like to tweak the settings of your virtual machine, you can do so by clicking the 'Settings' button.
Now, insert a Windows installation disc, select your virtual machine and hit 'Start'. You would see a new window of virtual machine and it boots from the Windows installation disc. Follow on screen directions to install Windows. Once, you are finished with installing Windows, you need to install 'Virtualbox Guest Additions'. In order to do so, Device > Install Guest Additions. Follow on screen directions to install Virtualbox guest additions. You would have to restart the virtual machine after installation.
That's it! Enjoy(?) Windows on your Mac.
Read more!
I came across Virtualbox a little while ago while futzing around in the internet tubes. However, at that time the virtualbox for OS X hosts was still beta2. With no real necessity for me to run Windows on Mac at that time, I decided to wait for the final version. As a part of my research, I now need to use a particular Windows program. So, before I shell out $$ for a copy of Fusion or Parallels, I decided to check up on Virtualbox.
Virtualbox for Mac OS X hosts (beta4) is now available for download here (~21MB disk image file). Once downloaded, in order to install, double click on the file to mount the image and simply drag the Vitrualbox app into the Applications folder. In order to run Windows on Mac, fire up the app and click on the 'New' button on the top left corner to create a new virtual machine. A wizard will guide you through the installation process.

Click 'Next'.

Give a name to your virtual machine. Since, I was going to install Windows, I named it so. Then, pick the 'OS Type' from the list and click 'Next' to continue.

You need to choose how much memory you would like to allocate for Windows. Whatever amount you choose here, that much amount of memory would be unavailable for other OS X apps when the virtual machine is running. If your computer is low on memory to start with, you should not allocate a lot of it to the virtual machine here. 192MB for Windows is a good bet; but I chose 512 in this particular case.

You now have to allocate hard drive space for Windows. If this is the first time you are using Virtual Box, it is very likely that you do not have a hard disk image already. So, you have to click on the 'New' button to create a new one.

A new window appears that will guide you through the steps to create a new hard drive image. Click 'Next' on the new window to continue.

There are two types of virtual disk images: one that dynamically expands and one that is of fixed size. You can pick any kind; in this case I picked one of fixed size.

A filename for your virtual disk image is automatically entered - it is same as the name of your virtual machine. For size, I allocated 10GB for Windows. If you think that you would need more space for files in your Windows partition, you should increase the size here. However, you should keep in mind that the hard drive space you allocate here would be immediately deducted from your total hard drive space on the Mac. So, if you are running short on your Mac hard drive space, you should stick to the minimum. Also, if you are not sure how much hard drive space you want to allocate for windows, go back and pick the dynamic kind of disk image. Once you are done, click 'Next' to continue.

Click 'Finish'. The setup will now start creating a virtual disk image. A little window with a progress bar will appear. It takes a few minutes to create the disk image. So, be patient.

Once the disk image is made, you would go back to the previous window - now with the boot hard drive selected.

Click 'Next' to continue and then 'Finish' to finish creating a virtual machine.

Once the virtual machine is created, you should see it in the main Virtualbox app window like this:

The default settings for a virtual machine should be okay. However, if you are a little adventurous and would like to tweak the settings of your virtual machine, you can do so by clicking the 'Settings' button.
Now, insert a Windows installation disc, select your virtual machine and hit 'Start'. You would see a new window of virtual machine and it boots from the Windows installation disc. Follow on screen directions to install Windows. Once, you are finished with installing Windows, you need to install 'Virtualbox Guest Additions'. In order to do so, Device > Install Guest Additions. Follow on screen directions to install Virtualbox guest additions. You would have to restart the virtual machine after installation.
That's it! Enjoy(?) Windows on your Mac.
Read more!
Subscribe to:
Posts (Atom)

 Posts
Posts

